Pages

Wednesday, February 3, 2021

Post 4: Create a USD asset with NXT


 USD Asset Creation

Post 4

In this blogpost on asset creation using USD we are going to look at shading also known as the Look of the asset.

To do this I am going to be using blender(cos free) and the RpR Hydra Addon also free...


Once you have that up and running it should look something like this:


Brain also did a Youtube video on how it works inside Blender:


You can also hook up NXT with blender if you want. BlenderAddon


Eventually we will use this workflow to build our USD assets in a more "artist" friendly manner. For now lets look at what we need to do USD wise to add in shading.

Sixth Layer (Payload look)

As always you can find the look nxt graph in the repo here.

Adding in the payload for the look could not be simpler in NXT. 

1. Create a new layer above the modelingsublayers layer

2. Instance the whole of the model payload(orange circle) onto this new layer and add it into your graph as shown in image below

3. Edit your new payload instance to save out as the look.usda stub(all the nodes that are yellow have been edited)

4. Save out the new look.usda(take note that it is not parented under the model save-purple node- it is a sibling)


Something you want to pay attention to is the List Position when you add in payloads, references and so on:

Front places the assets path at the top of the payload list, Back places at the bottom of that list. 

Something you can also do is place the model payload under the model def and the look payload under the look def, instead of in the same list as shown in images below.
So that you can list edit those separately from each other.


Something like this:


To do this I swapped the child order of when the payload gets made vs. when the model and look definition gets created:


Really cool that I can do this in NXT with pretty much zero hassle, I just change the order of the child nodes on the Stage Open node.


This post is getting pretty long, in the next post we will examine the look sublayers and what we can build for those. 


To be continued in Post 5 . . .


Sunday, January 17, 2021

Post 3: Create a USD asset with NXT


 USD Asset Creation

Post 3

In the last blog post on Asset Creation(Post 2) we created our first prim with a payload for the modelling department. But that is just the first step. 

What we now need to build are layers that will help modelling work proficiently.
First step is splitting up the geometry and the UV's, and creating some namespaces for good house keeping. 

We will also look at how an artist can interact with USD and how that would effect how we build our USD layers as a pipeline TD.


You can find this layer here: FifthLayer

Fifth Layer (Geom/UV Sublayers)

Now lets start with the geom sublayer:

We will be sub-layering(not payloading) into the model.usda a layer called geom.usda.

The reason we want to sublayer is so that it merges with any other sublayers we want to add from the artist. 
It also gives pipeline a USD(model.usd) to write USD specific fixes too as a departmant(this is not foo.usda that's for pipelineTDs), on top of anything modeling artist provides the pipeline. Now you can adjust data without having to actually alter the artist "files"(they will probably update them and you don't want to lose your fixes).


Lets take a look at the layers in USDVIEW


Blender

Lets add some actual 3D mesh to our geom.usda stub. 


If we crack open Blender 2.91 we can Export a usda file as shown in the image above, BUT.

We instantly run into some issues:

First problem: At the moment you can export USD out of blender but you can't import. So we cant start our "artist" off with the stub USD files we have made(if you use Houdini or Maya you can import those as a starting point).

If we export out of blender like shown above, we are just overriding all the setup we did, see image below. 


Now this wont break our overall setup(because we are sub-layering geom into model.usd), but we will lose all the stage data we added into the original stub.

To fix this we would need to build our own custom tools for when an artist starts their task(setup the correct hierarchy /foo/model/geom - Import tool -), And an Export tool to insure they don't just hard copy over our stub USD.

Second problem: Blender doesn't know what overrides are(cant just click a button to tell it to save a layer as overrides instead of defs). So we would need the custom exporting tool to know when we want to save as overrides.

Third problem: Blender saves its own data into the USD file(see above image). This is a pain but we can ignore it, or we could remove it with your custom exporter.

So we now need two more tools with UI for modelling in blender. 

This is why departments tend to have their own dedicated TDs. Most departments will have more then one DCC that they use, so bare that in mind when you build tools.

In this imaginary 3D studio they use blender for their modelling department. But it could just as easily have been Maya and Zbrush or 3D Studio Max and Mud Box. This is why USD/NXT is so important for pipeline. Having universal tools that can speak to all these DCC's is a life saver.


Moving on...

Wouldn't it be nice if we could use NXT to make the importer and exporter you say. Well . . .


But for now we will focus on the USD layers themselves, I will do a spin off blogpost on these two tools in future.

Back to USD...


Now lets instance the NXT node stack for the geom and make the UV node stack:


Say I want to change the order of my sublayers, with NXT its easy. I just place the green circles graph(uv) before the red(geom). Now when I run the code(after deleting old files) I get that the UVs are the strongest opinion(stomps on the geom UVs) which is great. UV's are always being updated and not always by the person who models the asset(obviously if point order changes then the uvs would break).


Also you would want to make the UV layer use an override not a prim definition:


 See top images for how I did that.

Now lets see what this all looks like put together in USDVIEW.


In the next post we look at the next department Look(texturing and shading).


To be continued in Post 4 . . .


Monday, January 11, 2021

Post 2: Create a USD asset with NXT


 USD Asset Creation

Post 2

Please see Post 1... 
If you have already...


You can find the following NXT layers here: ThirdLayer, FourthLayer


Third Layer (Prim data)

In this layer we are going to focus on the prim data for our asset, That includes things like: 
Asset Info - for this example I'm setting the asset ID, name and version. But you should really read through and understand ModelAPI to really use this to your advantage.
Inheritance: See class specifiers in the USD doc's for more on this, but classes are super powerful.
Also we will set what Kind the asset is(once again see model API for more on this from a usd perspective).


What you really want to do is start to pay attention to the structure of this USD file we are building:


As you can see in the top image, we have a block of code that is in between two (). This is our stage data(local data) for this layer.
Then we have our prim def that holds the primitive specific data(what is foo?).
After that we have our empty class that we inherit from in the prim.
This structure is super important for when you want to later "traverse" the stage and find info(more on traversal later tho).


Forth Layer (Payload model)

Next up we will add a payload to the foo prim definition using a new layer(purple). 


All the nodes that are now purple, I had to slightly tweak to make the payloading work for me. 
This is part of what makes NXT so amazing to me. If I need to change a bit of code for some reason I can so on the layer I'm working in. 
Knowing that the previous code is still on the layer below if I need to revert back all I do is delete the node on my purple layer.


When making the payload we are basically doing two things: Creating a usda file on disk.


And authoring the path to that layer into the original foo.usda.


What that looks like as usd:


Now the modelling department have their own layer to work with for the asset called foo. 
What makes this cool is that they don't ever have to actually edit the top level foo.usda. This is really important for colab with other departments(I will show this later)
The top level foo.usda can technically be managed now by the pipeline tools and would never need an artist to touch it.


Removing a whole lot of admin from them in the process.

Next post we will add some common info/workflow into the modelling layer for that department.

To be continued in Post 3 . . .

Friday, January 8, 2021

Post 1: Create a USD asset with NXT

 USD Asset Creation

Post 1

Trying to create a USD asset can turn into quite the journey...


When building USD assets you need to keep a few things in mind:

1. ModelAPI

2. Payload, Reference, Sublayer

3. LIVERPS

4.Variants

5. Classes

6. usda, usdc, usd

7. Prims

and much more... read the glossary!


Each one of these points are there to help departments after the asset has been made to better interact with said asset.

Pixar's Create Asset Tutorial

If we take a look at Pixar's python example to Create an Asset, we can quickly see that a lot of what's going on in this script has nothing to do with an actual 3d asset(as in open up zbrush and sculpt mesh). 


 Where to find things related to an asset(payloads, references). What is it (component, assembly, mesh)? And general 3d environment info (axis=y, unit size).

So why use USD?

USD


 Well in short, the admin required to make assets would normally be handled by the artists/TDs/pipelineTDs on the fly(people intensive and boring) with many department specific tools. This can create a lot of headaches as it gets handed off to all the different departments and software along the line. USD knows what the pipeline needs and allows you to build it into your assets from the start. Now you end up with, not just the 3D geometry but also a Universal Description of what that means.... a "SMART Asset". That can be used in any software that support USD.

So why use NXT?

NXT


NXT's visual code style and ability to layer and instance nodes and graphs around suits USD very well. In my opinion NXT adds a needed level of management to USD that makes it more "user friendly" without the TD having to subscribe to any DCC's workflow/integration and drawbacks. It works more inline with USD's core idea of "Universal" and "Open".

All the below tutorial graphs can be found here: nxt_usd_graphs

USD core Library in NXT...

I have already started to make a core lib of USD nodes for NXT and we will be using a lot of them make our asset template.

USD NXT LIB


Note: I'm ignoring the variants for now. I Will do variants in an up coming blog post.


First Layer (Open/Create)

Here we will simply create the top level foo.usda stub file.

We will use three nodes:

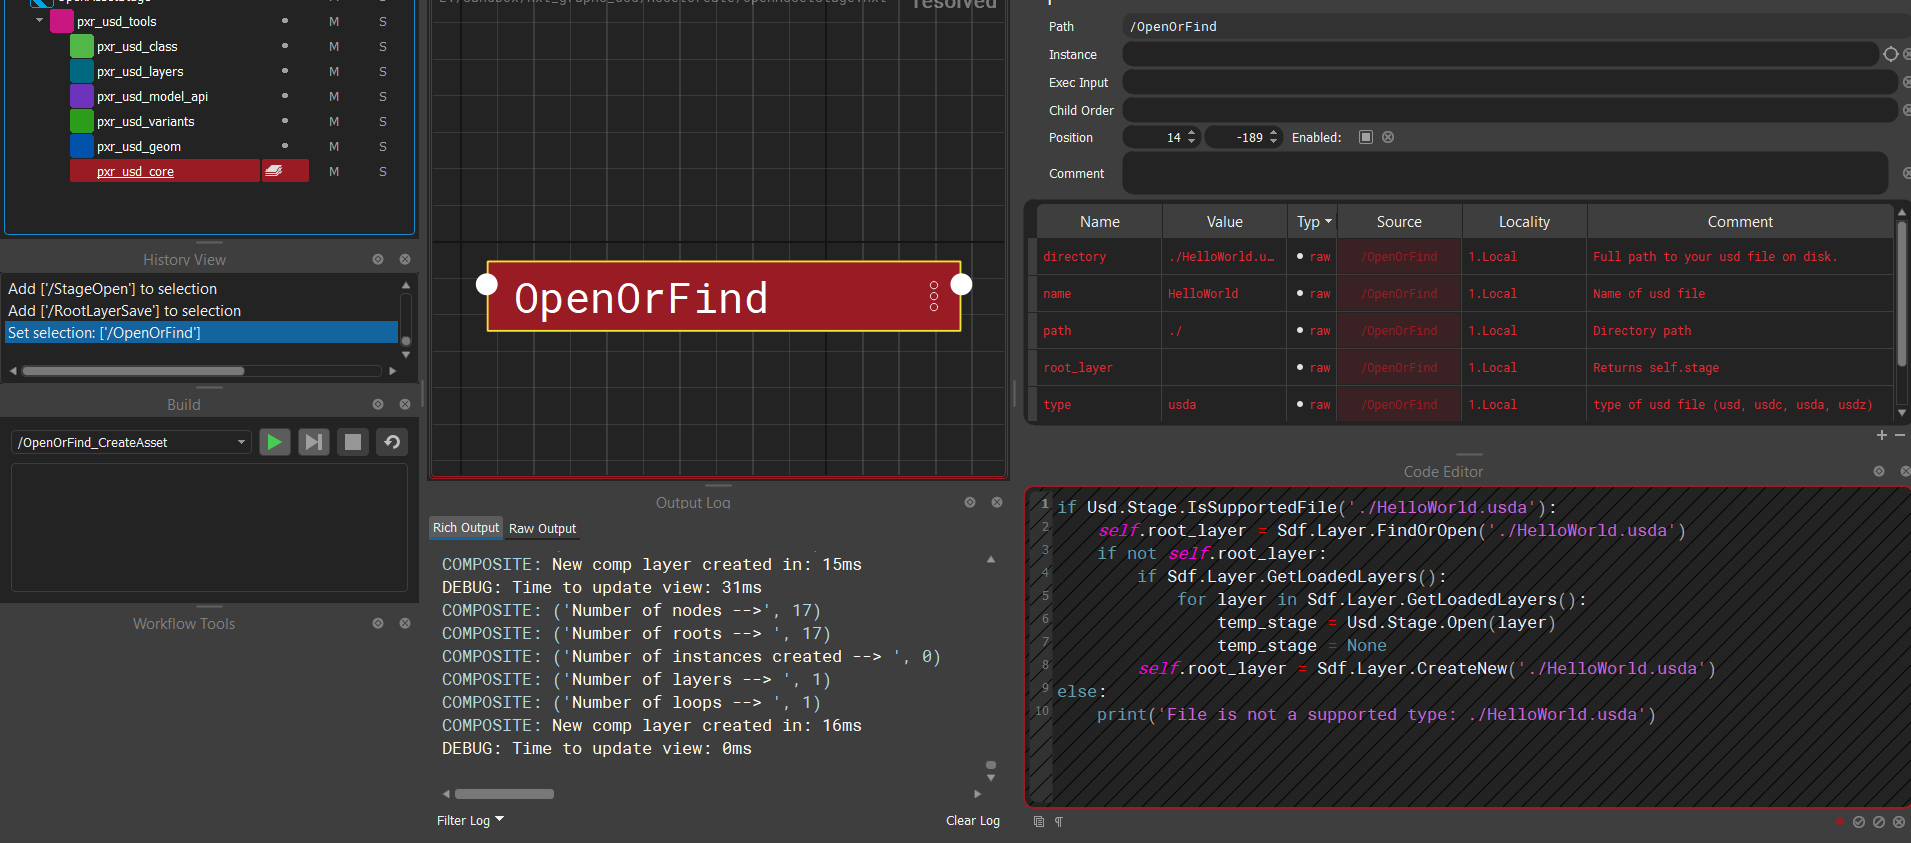
findOrOpen, OpenStage and RootLayerSave nodes. They are all part of the usd_core(red)
layer in NXT.


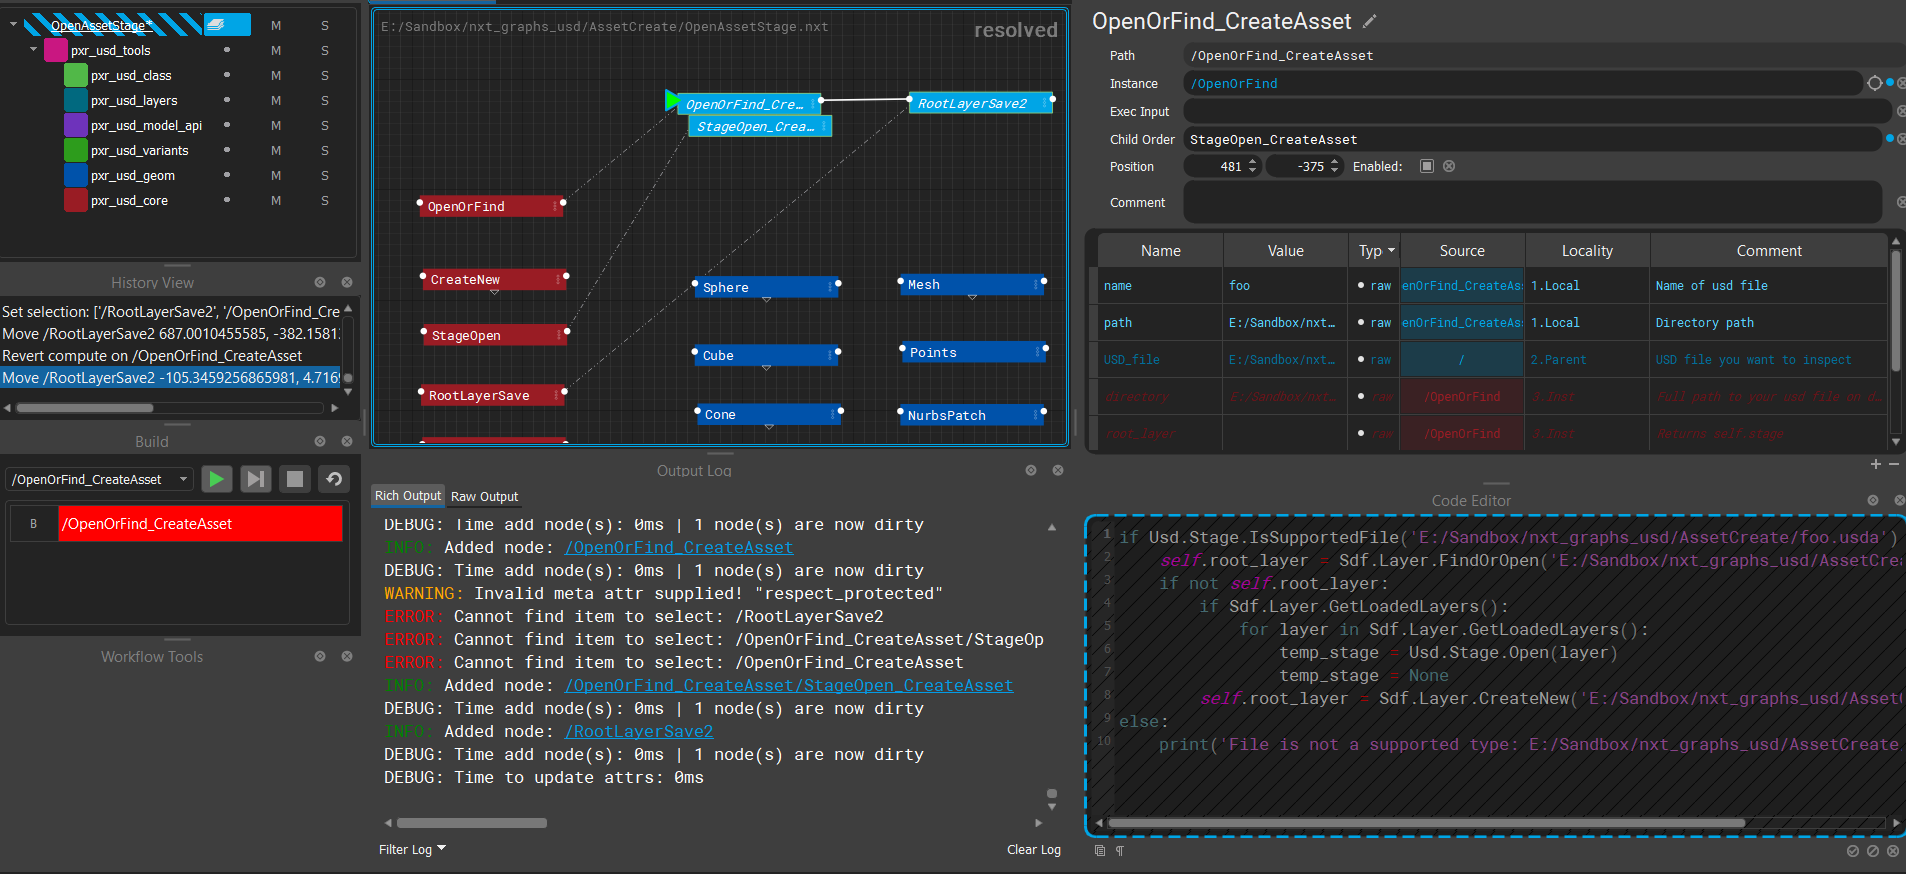
We are going to create a new layer above the tools layer(pink) and instance these nodes into that layer like:


When you execute this layer(see NXT docs on how this works). You should end up with a USD that looks like this:


An "empty" usda. Please note that we will be doing all the tuts as usda so we can see what gets written into the usd files. For geo and large data sets usdc files are a much better file type.

If you are unsure of where to find your usda file check your USD_file attrubute:


Second Layer (Stage data)

Now lets create a second layer above our first layer and add in some basic stage data:


Set Stage Axis allows us the ability to tell any DCC what the up Axis for a give USD is.


By making the axis a attribute in NXT it can easily be updated or changed as we add layers.

Next we set the scene scale:


This is super helpful when going between different DCC's(software) like Maya and Houdini.

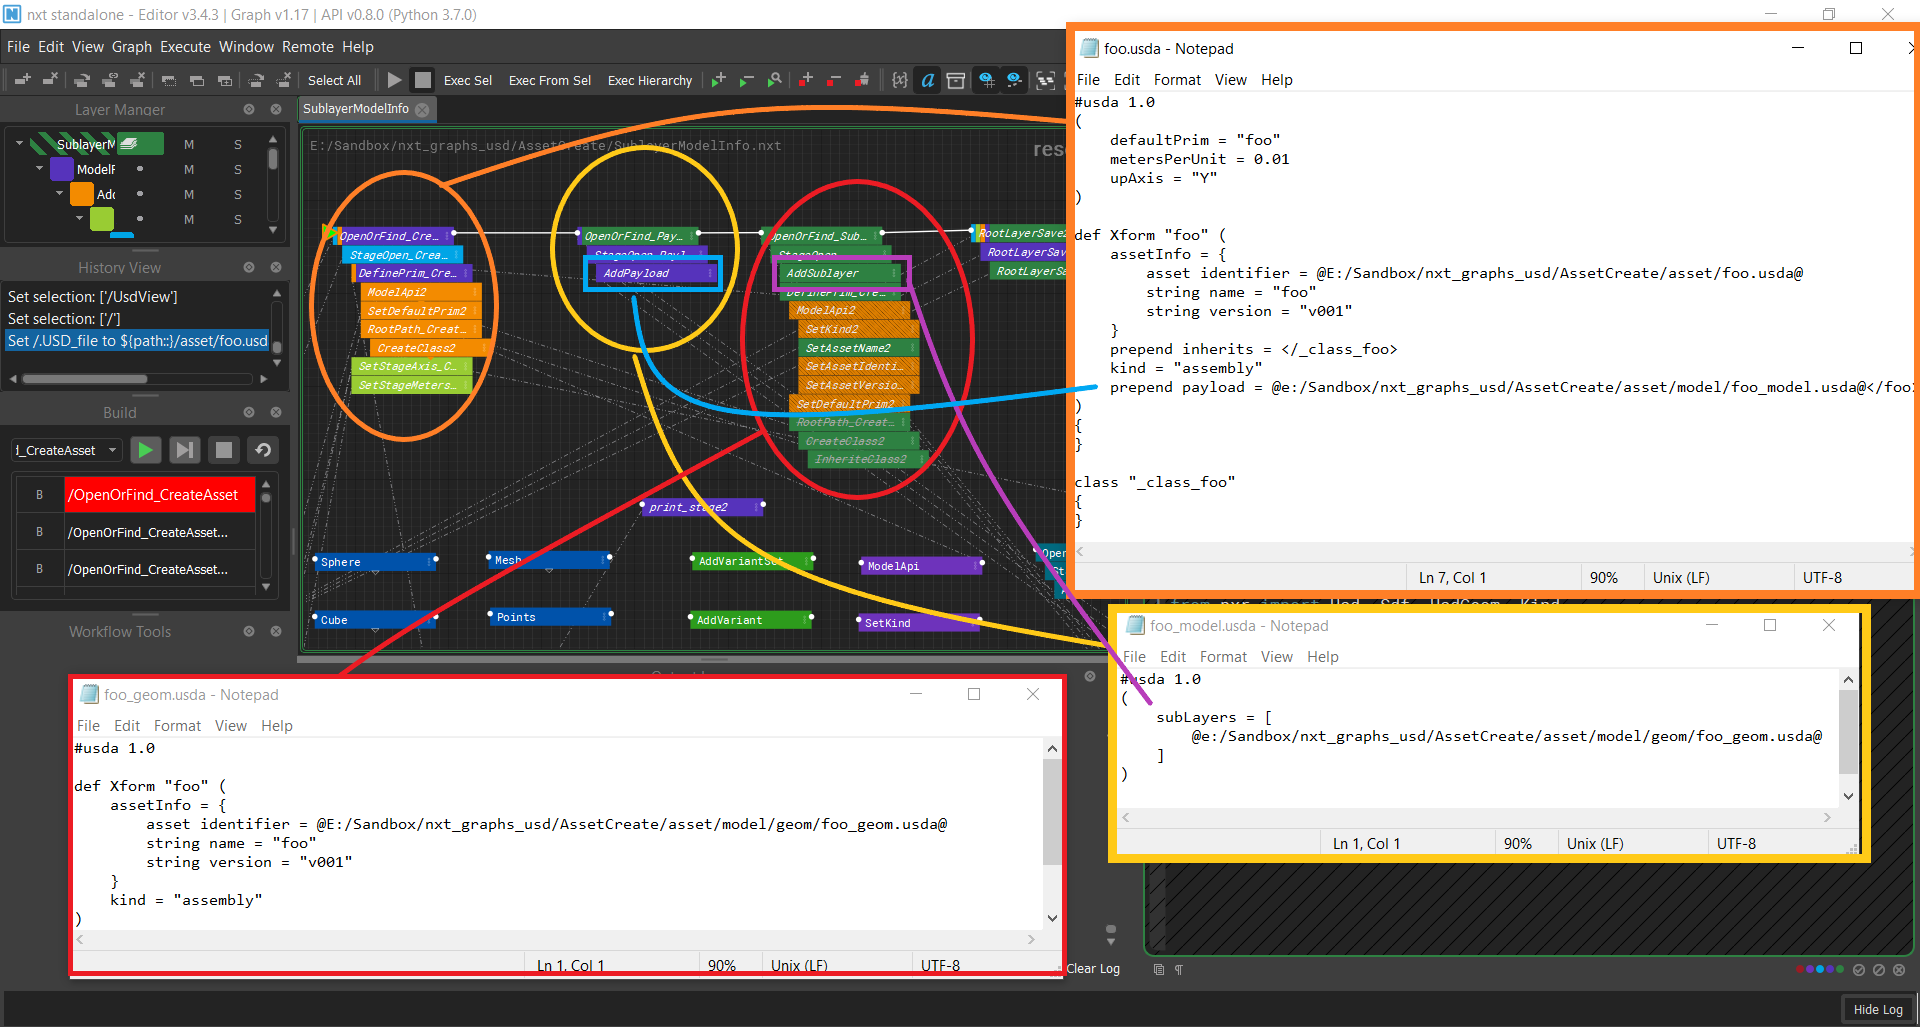
Now when we execute our NXT graph we should end up with a foo.usda that looks like this: 


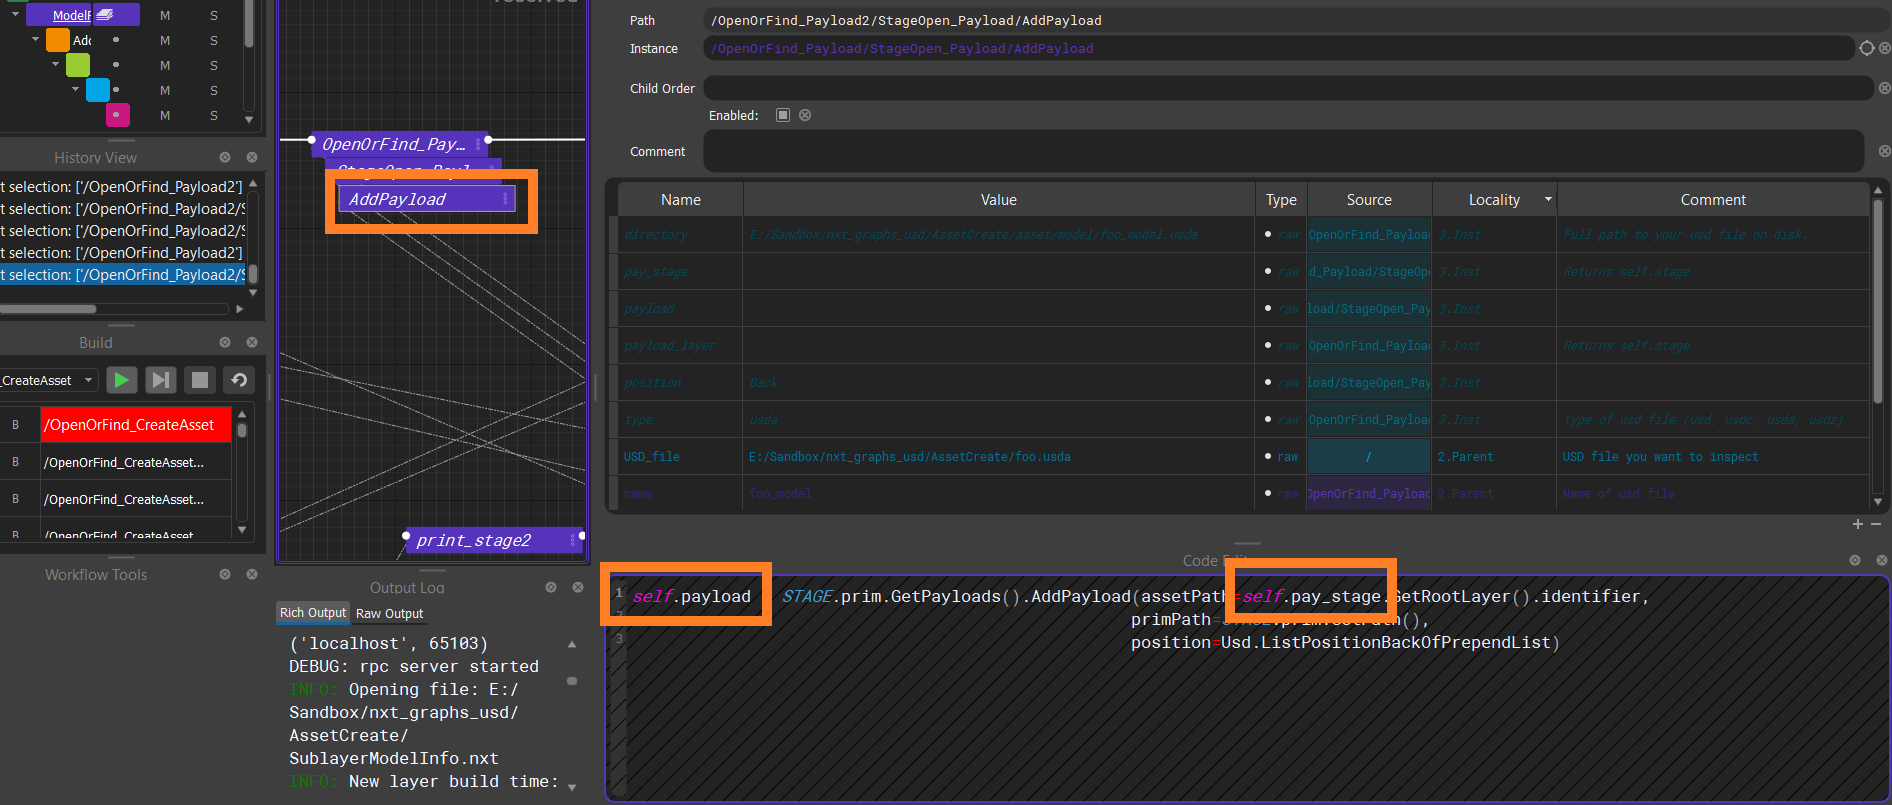
Next post we will add the main prim data and a payload to that prim.

To be continued in Post 2 . . .


Monday, December 7, 2020

Opensource project NXT/USD

NXT


nxt_graphs_usd


So for the last month or so I have been working on a opensource project(nxt_graphs_usd) that builds off of USD Pixars awesome pipeline API, inside of another opensource project called NXT(Node eXecution Tree).


USD NXT fusion baby!


In my repo you will find a bunch of useful nodes for building up USD files, like authoring variants. 

The example below is based off of Pixars own tutorials.


I will be adding to this repo on and off, so there will be more updates coming.


End...

Thursday, December 3, 2020

Learning USD

For the last year I've been busy learning USD .  Here's a sneak peak at it, I will be posting more coming soon.....


Thursday, July 11, 2019

Sunday, February 18, 2018

The highway rat....


The project I worked on last year...
Done in Autodesk Maya, rendered with Arnold.

I did facial rigging and VFX.


End.

Cool Revolting Rhymes clip. And the making of


And then, the making of :D/

Monday, January 22, 2018

Revolting Rhymes - Trailer


Hey all, 

One of the projects I worked on recently has released an awesome trailer.
I was Lead of Rigging, Fur/Hair and VFX on this one. Was a crazy fun, extreme time.


End