Pages

Showing posts with label Python. Show all posts

Monday, January 11, 2021

Post 2: Create a USD asset with NXT


 USD Asset Creation

Post 2

Please see Post 1... 
If you have already...


You can find the following NXT layers here: ThirdLayer, FourthLayer


Third Layer (Prim data)

In this layer we are going to focus on the prim data for our asset, That includes things like: 
Asset Info - for this example I'm setting the asset ID, name and version. But you should really read through and understand ModelAPI to really use this to your advantage.
Inheritance: See class specifiers in the USD doc's for more on this, but classes are super powerful.
Also we will set what Kind the asset is(once again see model API for more on this from a usd perspective).


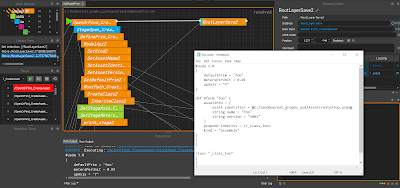
What you really want to do is start to pay attention to the structure of this USD file we are building:


As you can see in the top image, we have a block of code that is in between two (). This is our stage data(local data) for this layer.
Then we have our prim def that holds the primitive specific data(what is foo?).
After that we have our empty class that we inherit from in the prim.
This structure is super important for when you want to later "traverse" the stage and find info(more on traversal later tho).


Forth Layer (Payload model)

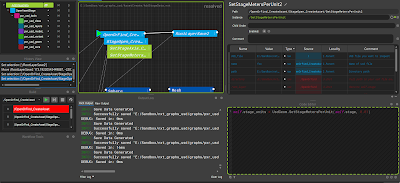
Next up we will add a payload to the foo prim definition using a new layer(purple). 


All the nodes that are now purple, I had to slightly tweak to make the payloading work for me. 
This is part of what makes NXT so amazing to me. If I need to change a bit of code for some reason I can so on the layer I'm working in. 
Knowing that the previous code is still on the layer below if I need to revert back all I do is delete the node on my purple layer.


When making the payload we are basically doing two things: Creating a usda file on disk.


And authoring the path to that layer into the original foo.usda.


What that looks like as usd:


Now the modelling department have their own layer to work with for the asset called foo. 
What makes this cool is that they don't ever have to actually edit the top level foo.usda. This is really important for colab with other departments(I will show this later)
The top level foo.usda can technically be managed now by the pipeline tools and would never need an artist to touch it.


Removing a whole lot of admin from them in the process.

Next post we will add some common info/workflow into the modelling layer for that department.

To be continued in Post 3 . . .

Friday, January 8, 2021

Post 1: Create a USD asset with NXT

 USD Asset Creation

Post 1

Trying to create a USD asset can turn into quite the journey...


When building USD assets you need to keep a few things in mind:

1. ModelAPI

2. Payload, Reference, Sublayer

3. LIVERPS

4.Variants

5. Classes

6. usda, usdc, usd

7. Prims

and much more... read the glossary!


Each one of these points are there to help departments after the asset has been made to better interact with said asset.

Pixar's Create Asset Tutorial

If we take a look at Pixar's python example to Create an Asset, we can quickly see that a lot of what's going on in this script has nothing to do with an actual 3d asset(as in open up zbrush and sculpt mesh). 


 Where to find things related to an asset(payloads, references). What is it (component, assembly, mesh)? And general 3d environment info (axis=y, unit size).

So why use USD?

USD


 Well in short, the admin required to make assets would normally be handled by the artists/TDs/pipelineTDs on the fly(people intensive and boring) with many department specific tools. This can create a lot of headaches as it gets handed off to all the different departments and software along the line. USD knows what the pipeline needs and allows you to build it into your assets from the start. Now you end up with, not just the 3D geometry but also a Universal Description of what that means.... a "SMART Asset". That can be used in any software that support USD.

So why use NXT?

NXT


NXT's visual code style and ability to layer and instance nodes and graphs around suits USD very well. In my opinion NXT adds a needed level of management to USD that makes it more "user friendly" without the TD having to subscribe to any DCC's workflow/integration and drawbacks. It works more inline with USD's core idea of "Universal" and "Open".

All the below tutorial graphs can be found here: nxt_usd_graphs

USD core Library in NXT...

I have already started to make a core lib of USD nodes for NXT and we will be using a lot of them make our asset template.

USD NXT LIB


Note: I'm ignoring the variants for now. I Will do variants in an up coming blog post.


First Layer (Open/Create)

Here we will simply create the top level foo.usda stub file.

We will use three nodes:

findOrOpen, OpenStage and RootLayerSave nodes. They are all part of the usd_core(red)
layer in NXT.


We are going to create a new layer above the tools layer(pink) and instance these nodes into that layer like:


When you execute this layer(see NXT docs on how this works). You should end up with a USD that looks like this:


An "empty" usda. Please note that we will be doing all the tuts as usda so we can see what gets written into the usd files. For geo and large data sets usdc files are a much better file type.

If you are unsure of where to find your usda file check your USD_file attrubute:


Second Layer (Stage data)

Now lets create a second layer above our first layer and add in some basic stage data:


Set Stage Axis allows us the ability to tell any DCC what the up Axis for a give USD is.


By making the axis a attribute in NXT it can easily be updated or changed as we add layers.

Next we set the scene scale:


This is super helpful when going between different DCC's(software) like Maya and Houdini.

Now when we execute our NXT graph we should end up with a foo.usda that looks like this: 


Next post we will add the main prim data and a payload to that prim.

To be continued in Post 2 . . .


Sunday, January 8, 2017

Make group with custom name, Using Python


Alo all,

Today I will share with you another simple python code.

What does it do:
Creates an empty group in Autodesk Maya, then prompts you for a name for that group.

Here is what that code looks like:

group in maya with prompt
*Click to make bigger*

Here is what the prompt looks like in Autodesk Maya:


*Click to make bigger*

Place name in the prompt the press ok. And presto, a group with your chosen name appears.


*Click to make bigger*

Here is that script for downloading:


End :D/

Wednesday, December 21, 2016

Copy override color script.


A little script for coping .override color RGB values from one object to another.

override RGB Script
 *Click to see full size*

What it looks like in your Maya scene.


Notes: New version here's what it looks like now:


Improvements: Can take any RGB color now.
Assigns right color to right copy object all the time :D/

things that need to still be done : Clean up, and error msg.

Here's a link to download if you like:

:D

Friday, December 4, 2015

Maya....


Rigging

.....after a six year sabbatical into Softimage.

So I'm crossing over to the dark side(Autodesk Maya) for my new project here at work. To be honest it hasn't been as hard as I imagined it would be... O_____O for now.

Just a screen grab of work in progress.

Rigging

Also applying my limited Python knowledge now. He he he 

Code things


I have found that Maya seems improved since I last used it(version 8.5 or some thing) but it still feels less "visually friendly" then Softimage.

Maybe its just cos I'm still sad about Soft going the way of the Dodo.

END

Thursday, September 25, 2014

How to install and use Symmetrice hair by booyabase...


So here is a video showing how to use a .py file off the net in XSI

*Note that every .py file is hand made and the maker can place his user menu where ever he wants*


Anyway... hope this video helps you out Mario :D

P.S this .py said it was made for 32 bit but it worked perfectly well on my 64 bit xsi... Win.


*By the way, this is a great little tool Booyabase*

Monday, June 24, 2013

91,6% for my python course HOORAY!

   
*Click to make Bigger*

Friday, May 17, 2013

My first Python game HOORAY!!


PONG


Below is a video of me playing against myself -lol- I suck at playing pong....


Loved making my first little game in python, though. 
Most fun part was creating the simple reflection and collision we needed for the ball. I use some vector math and an if statement. There was also the fact that the paddles cant go off screen, and they needed to only move when you hit the correct keys on the keyboard.

The math looked something like this.....

For movement:

Math:
p(t+1) = p(t) +(1)(v(t))

p = position
v = vector
t = time

Python:
New pos      Init pos
p[0] =     p[0] + v[0] 
p[1] =     p[1] + v[1]

 ball_pos[0] += vel[0]
 ball_pos[1] += vel[1]

*add a negative value on the horizontal vector to make the reflection off of paddle.*

ball_pos[0] += vel[0]
 ball_pos[1] -= vel[1]

and then to get distance between two points:

Python:
dist(p, q)                            
return math.sqrt((p[0]-q[0])**2+(p[1]-q[1])**2)

then you pretty much just say if point 0 is in the same range as point 1, point 0 either reflect off of the pad or hits the wall.

With the paddles:

To move paddles:

 I used a local acceleration variable when the player hits a key(up or down)

To keep paddle on screen:

I made an if statement that stopped the paddle from going beyond its own height off screen

Python:
if paddle1_pos[0] + paddle1_vel[0] <= PAD_HEIGHT


Anyways was awesome fun :D/


Sunday, May 12, 2013

Collatz Conjecture In Python and ICE...


Statement:
Consider the following operation on an arbitrary positive integer:
If the number is even, divide it by two.
If the number is odd, triple it and add one.
In modular arithmetic notation, define the function f as follows:


if statement for colletz conjection


Collatz in Python:

To make this collatz conjecture I used a simple if statement, see code below... 


Python Collatz conjecture program
*click to make bigger*

Here is a video of how that all works with a gui:


Collatz in ICE:

In ICE I used the same idea as I used in python. Then just added a repeat node to get an updated n number.

Collatz Conjecture in Softimage/ICE
*click to make bigger*

What that looks like:


End :D

P.S :


Monday, May 6, 2013

Convert miles to feet....


To convert miles to feet you need to know how many feet there is in a mile. Google says....


*I'll take their word for that*


In python to convert would look something like this:

Convert miles to feet in python
*click to make better*

So how could we do this in Softimage and ICE?

String in Softimage
*click to make bigger*

My first attempt gets the right answer for the conversion,  but I would like it to say "...miles equals how ever much feet" like in the example in python so not very happy yet. 
It seems that the string nodes wont be of much help either, as they don't convert floats to string like in python.


Will have to look at a different way around this problem. :/

too be continued...